Wednesday, August 31, 2022

Simon Says Stamp STAMPtember release day

It's here!! STAMPtember release day! So excited to share with you the entire release! I'm pretty sure it will knock your socks off! To see the entire release juser click HERE

I have made a couple of fun cards using some of the products from the STAMPtember release. I'll be sharing lots more throughout the month.

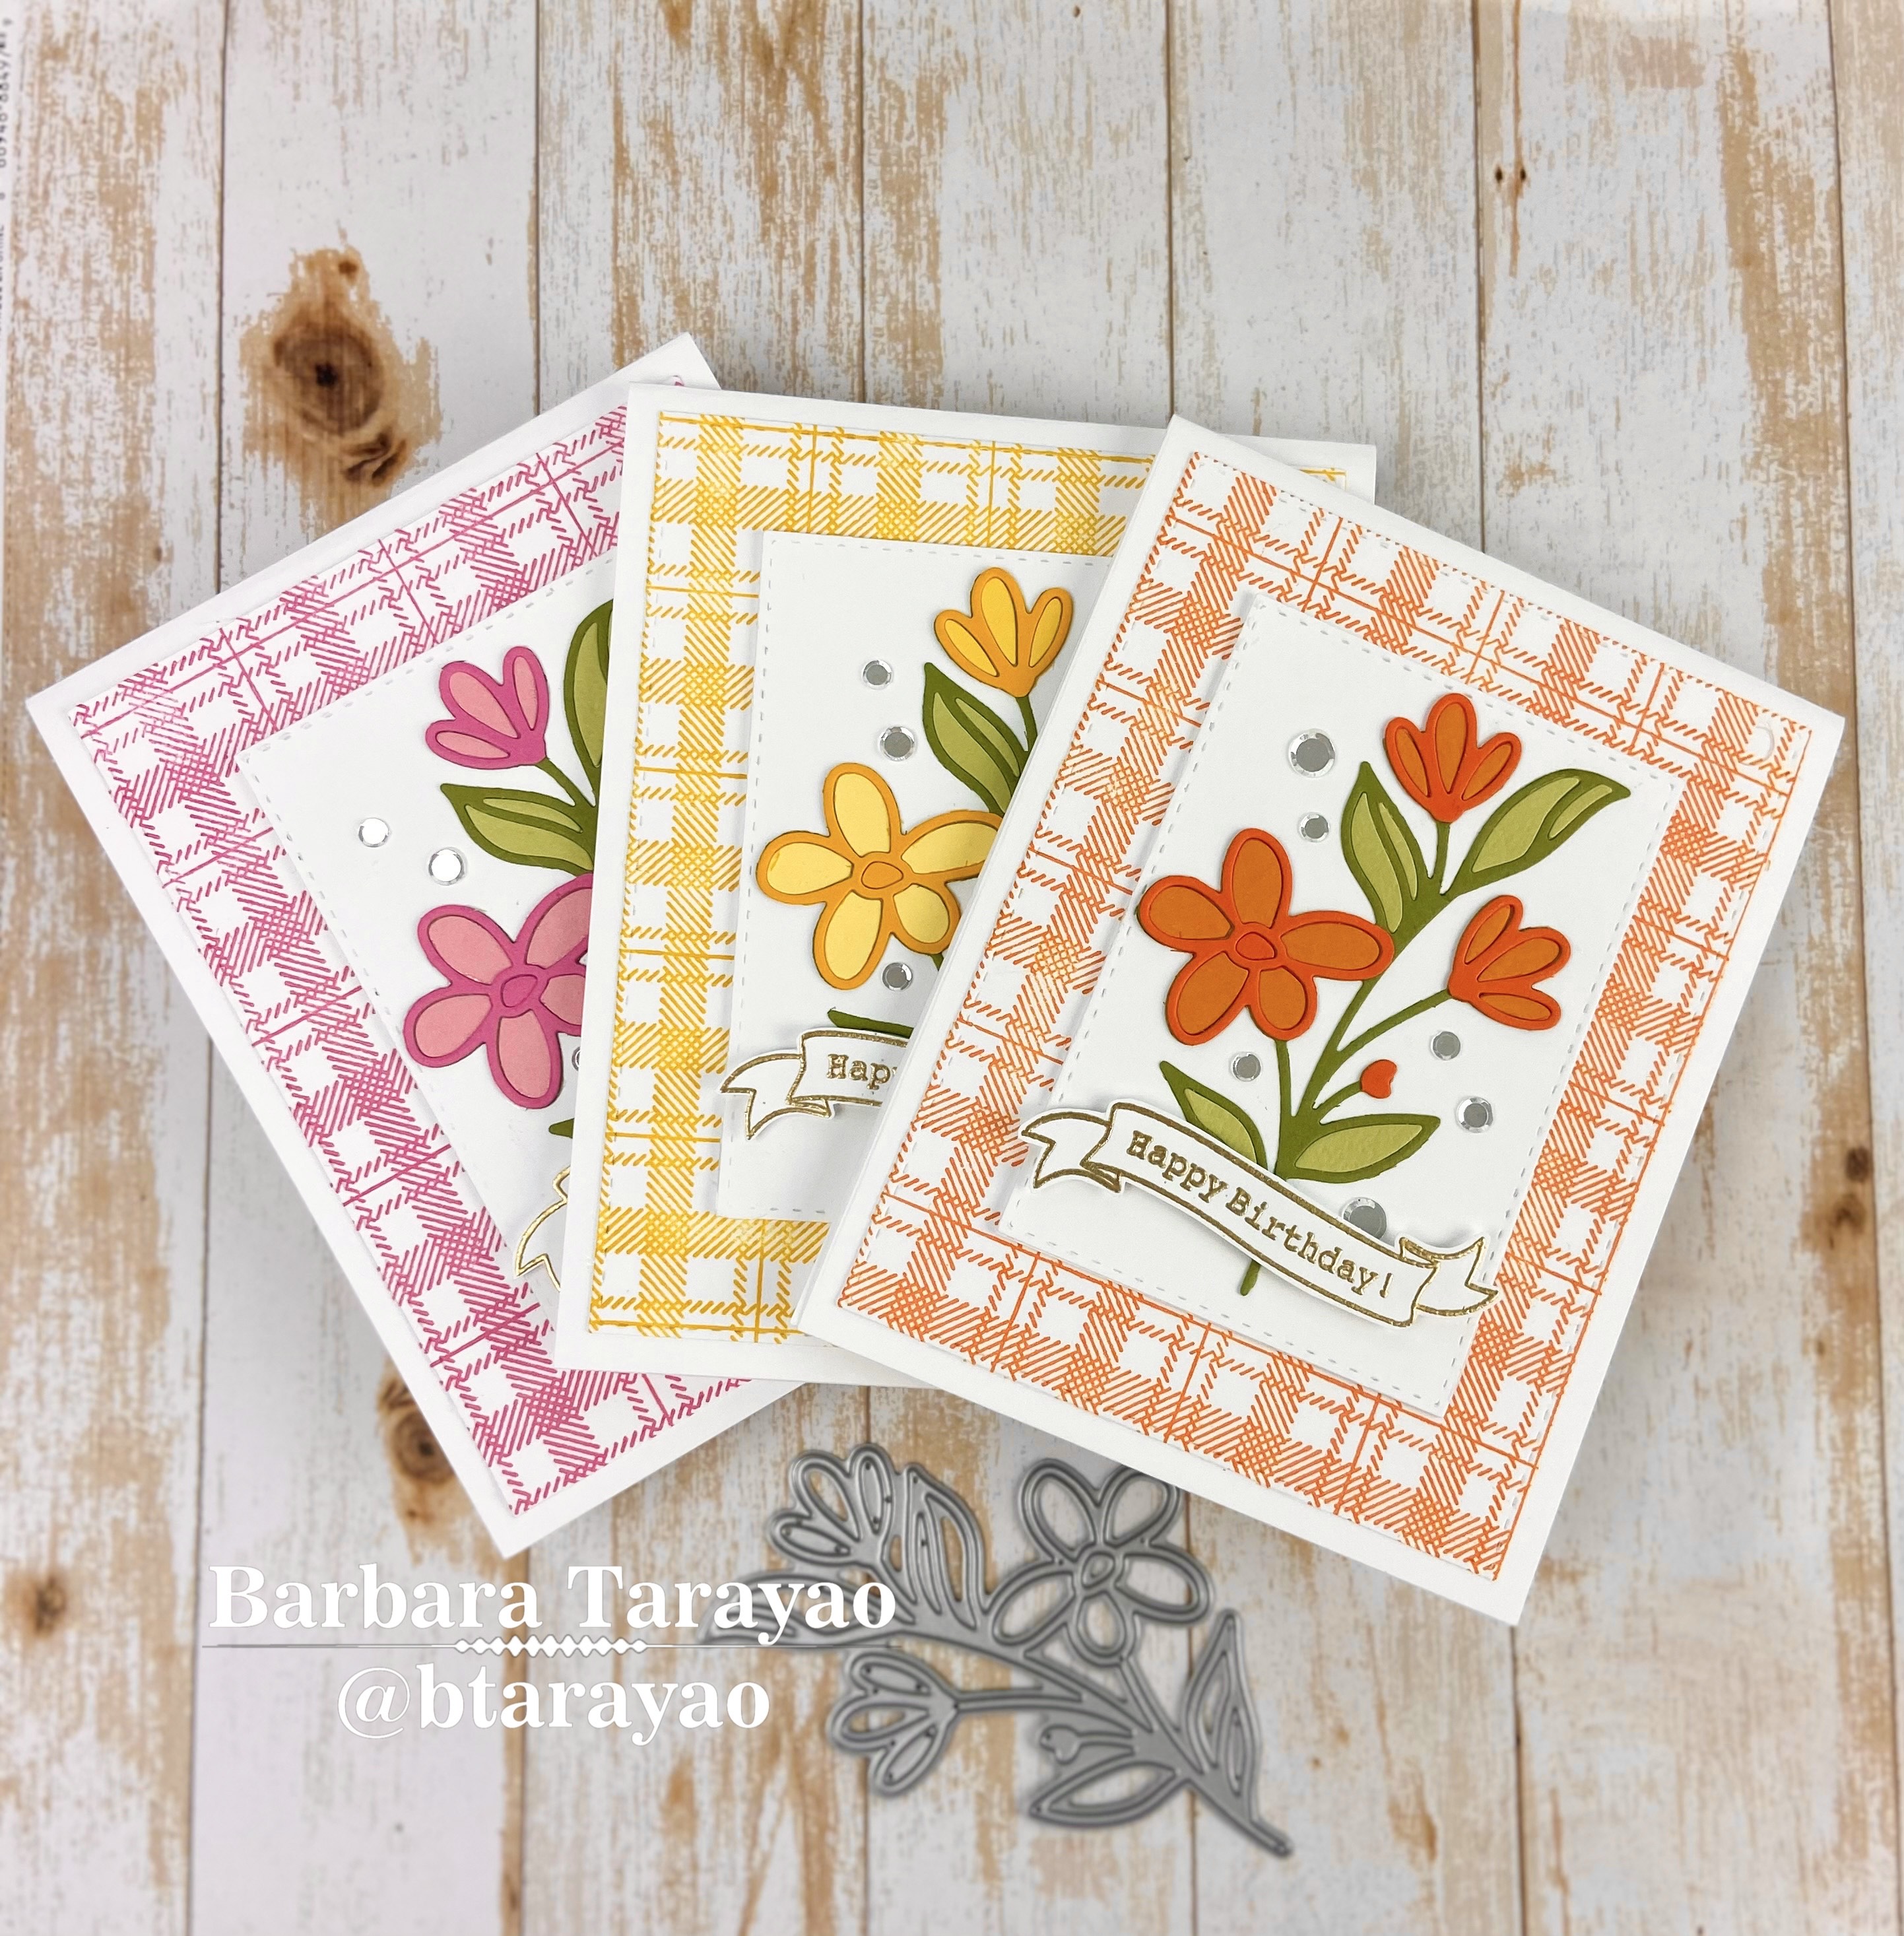
These two cards feature the Flourishing Bloom Plate die.
I actually die cut the cover plate several times from white, coral, pink and yellow cardstock to create an almost no-color card.
I added some shine by heat embossing the background with a pearl embossing powder.

I wanted to show how to use it a couple ways.
This card featured a colorful background with the cover plate cut from white cardstock.
I made this card using an A2 size cardbase. I ink blended the front of the card with distress oxide inks. I then ink splattered the card with gold and white paint. I then die cut the Flourishing Bloom cover plate out of white cardstock. I die cut it 3 times and adhered together for extra thickness. I then used the same gold paint to the leaves and the centers of each flower. I embossed the sentiment using a watermark ink and gold embossing powder onto vellum and die cut it out and added to the top portion of the card.
Here is a little video to show the shine of the card.


Come back tomorrow for the BIG STAMPtember BLOG party!! You don't want to miss it. There will be special offers and more inspiration. This whole month is going to be a wild ride so hang on!

Tuesday, August 30, 2022

CZ Design Anything Goes

Hi all and welcome to another week of the Simon Says Stamp Wednesday Challenge.

This week's challenge is  Anything Goes!

We are showcasing CZ Design products this week. You don't have to use them to join in but if you have some we would love to see what you make! As always just for entering you will be eligible for the the drawing of a $25 voucher to the Simon store!
I was so thrilled to see this week's theme was to use CZ Design products! I just love everything she creates. The only problem was trying to choose which of her amazing stamps and dies to use. 
I know a few people that need a bit of cheering up. So I chose the Feel Better Soon die. I also used some bright cheery colors. I guess we all need a bit of cheering up sometime.
This card came together fairly easy. I began with an A2 size card base made from white cardstock. I then used s stitched rectangle die to cut a panel from white cardstock. I ink blended the panel with distress ink very lightly and added some coordinating ink splatters using a paintbrush and water. I let it dry and then stamped a leafy background stamp over the ink using watermark ink and embossed it with clear embossing powder trapping the lightly blended ink colors under the leaves. I then used some darker distress ink to blend over the top of the whole background. I rubbed off the excess with a damp cloth. I then die cut the sentiment out of a coral cardstock and the frame from white cardstock and added it to the center of the card. I die cut a few flowers and arranged them around the sentiment. 

I hope you enjoyed the card I made today and if you are interested in any of the products I used, they are listed and linked below for your convenience. All supplies can be found at the Simon Says Stamp store.

Supplies:

***If any product is out of stock, just click on the "Notify Me" button and you will receive an alert from Simon when that item is back in stock! 

Now it's you turn! Happy crafting!

Do you use Instagram ?  If so please add  #ssswchallenge to your challenge entry uploads so we can see them on there too.


You have until Wed  8am Ohio time. 1pm UK time, 2 pm CET to join in


Thursday, August 25, 2022

Simon Says Stamp Let's Celebrate September Card Kit

So excited to make a card from the amazing Simon Says Stamp September card kit Let's Celebrate. Couldn't wait to get my hands on it.  Always, always need birthday cards! I also wanted to share a fun technique with the embossing folder in the kit. Lot's of birthday goodies in this kit.
The embossing folder technique I wanted to share is called "ink pressing". I'm sure there is a more technical term for this but this will do for now! I've been doing it for years. It's a fun technique that has so many possibilities for amazing results. 
I began with an A2 size card base made from smooth white cardstock. I then trimmed down another piece of white card to make a panel that would be a bit smaller than the card base. I really like to have a white border on most of my cards. I just think they look more finished and pleasing to my eye. I then took the embossing folder and inked up the FLAT side of the inside of the folder. The inside of the folder has "hills" and "valleys". This would be the valley side where the paper gets pressed into. That is where you would apply the ink. I used distress ink for this project, but it will work with any ink really.

I then took the panel and spritzed it with a mist of water to prevent tearing and added it to the folder. I then ran it through my die cut machine. I then added some gold paint detail to the embossed parts of the background. I then stamped the sentiment on heavy weight white cardstock using watermark ink and heat embossed it with gold embossing powder. I die cut it out using a circle die. I then die cut a 2nd circle out and adhere them together for a bit of thickness. I then ran more white cardstock through the die cut machine using the embossing folder but this time without the ink. I cut out some of the embossed flowers and added them around the sentiment using foam squares. That's it!! Super easy with beautiful results, my favorite kind of card.


Tuesday, August 23, 2022

Gina K Designs Shimmer and Shine

Hi all and welcome to another week of the Simon Says Stamp Wednesday Challenge.

This week's challenge is  Shimmer and Shine!

We are showcasing Gina K Design products this week. You don't have to use them to join in but if you have some we would love to see what you make! As always just for entering you will be eligible for the the drawing of a $25 voucher to the Simon store!
I wanted to incorporate several techniques into making this card for the challenge. So I watercolored the background, used die cuts and did some stamping!
Making a card when you can take your time and really play with different techniques is the best way to play and create.  
So I began with an A2 size card base using smooth white cardstock. Using watercolor paper and a stitched rectangle die I cut down a panel to leave a bit of a border. I chose some soft distress ink colors to create a beach scene. I just added a bit of water with a paintbrush to create the scene. After the panel was dry I adhered it to the cardbase and die cut the words sunshine out 3 times from heavy white cardstock. I did the same with the fence. I then stamped in black ink the sentiment, tall grass and birds. I added a bit of glitter to the ocean for the shimmer part of the card. 
Here is a little video to show the shimmer and shine!

I hope you enjoyed the card I made today and if you are interested in any of the products I used, they are listed and linked below for your convenience. All supplies can be found at the Simon Says Stamp store.

Supplies:

***If any product is out of stock, just click on the "Notify Me" button and you will receive an alert from Simon when that item is back in stock! 

Now it's you turn! Happy crafting!

Do you use Instagram ?  If so please add  #ssswchallenge to your challenge entry uploads so we can see them on there too.


You have until Wed  8am Ohio time. 1pm UK time, 2 pm CET to join in


Tuesday, August 16, 2022

Spellbinders Christmas

Hi all and welcome to another week of the Simon Says Stamp Wednesday Challenge.

This week's challenge is  Christmas

We are showcasing Spellbinders products this week. You don't have to use them to join in but if you have some we would love to see what you make! As always just for entering you will be eligible for the the drawing of a $25 voucher to the Simon store!
I know Christmas August? Yes!! It has been my experience that you can never start too early on your Christmas/holiday crafting. 
Sometimes I like using non-traditional colors to make my Christmas cards. Just to mix it up a bit and since it's only August, I wanted to hold on to some of those pastel colors while making an elegant holiday card. I hope you like it!
I created this card with an A2 size card base using bright white cardstock. I rarely make a card that doesn't have a white border so I cut a panel from another piece of white cardstock. I die cut several sizes and colors of poinsettias and added them in a bit of a wave formation on the panel. I then die cut the word Joy from gold cardstock and added that to the panel. I then pulled out my hot foil machine to use the amazing hot foiled holiday sentiments and chose one that went with the word Joy and foiled it in gold. I trimmed it into a sentiment strip and added it under the Joy. I then used left over pieces of gold cardstock and punched out circles for the center of my poinsettias to pull it all together.

I hope you enjoyed the card I made today and if you are interested in any of the products I used, they are listed and linked below for your convenience. All supplies can be found at the Simon Says Stamp store.

Supplies:


***If any product is out of stock, just click on the "Notify Me" button and you will receive an alert from Simon when that item is back in stock! 

Now it's you turn! Happy crafting!

Do you use Instagram ?  If so please add  #ssswchallenge to your challenge entry uploads so we can see them on there too.


You have until Wed  8am Ohio time. 1pm UK time, 2 pm CET to join in


Sunday, August 14, 2022

Just a Note Simon Says Stamp Dream Big release

It's hard to believe that Summer is winding down and school is right around the corner! I wanted to make a teacher appreciation card. For several years I was a substitute teacher and I can tell you first hand how hard teachers work! I've worked with children of all ages from kindergarten all the way up to high school. 
I made this card using an A2 size card base made from smooth white cardstock. Using more white cardstock I die cut a stitched rectangle panel to leave a border. I stamped the pencil image 5 times from the Take Note stamp set from the new Dream Big release. I used a copic friendly ink that does not smear. I colored each pencil in using some basic primary colors. I fussy cut them out and aranged them around the sentiment that I stamped in black ink. I trimmed off the pieces of pencil hanging over and used to cut pieces to fill in white spaces. 
I made a quick video to show you how I made this card. Please leave a comment if you have any questions! Thank you for stopping by.

Tuesday, August 9, 2022

My Favorite Things Summertime Blues

Hi all and welcome to another week of the Simon Says Stamp Wednesday Challenge.

This week's challenge is  Summertime Blues!

We are showcasing My Favorite Things products this week. You don't have to use them to join in but if you have some we would love to see what you make! As always just for entering you will be eligible for the the drawing of a $25 voucher to the Simon store!
I absolutely fell in love with these stitched blooms when I saw them! I paired them with some soft water color shades for my summertime blues card.
So I have to confess that Summer is not my favorite time of the year. I loved Summer when I was younger but as I have grown older I have come to love Fall and even Winter as my favorite time of the year. I have moved to a state in the US that is very mountainous and lots of deserts too. So the summers here are very hot! I do not like hot! You might think I'm crazy but I prefer cool even cold. What can I say? I love to snuggle under heaps of warm blankets and sip hot cocoa. So the phrase Summertime Blues has a very different meaning to me!
I made an A2 size card base from smooth white cardstock. I then die cut a stitched rectangle panel from more white cardstock and ink blended it using some light gray ink. I then cut an even smaller stitched rectangle panel from watercolor paper and used a technique called ink smooshing. I know that sounds funny, but it is the best name for it. Pressing the ink pad onto a glass surface and spritzing it with water and then taking the watercolor paper and kissing or smooshing it into the ink leaves a nice soft blend of color. I let that dry. 
I then die cut all the stitched blooms that I wanted to use and ink blended them with coordinating ink. I layered the blooms using foam squares for some dimension and added them to the front of the watercolored panel. I added leaves and the miss you sentiment. I few white flat pearls to add some interest. 

I hope you enjoyed the card I made today and if you are interested in any of the products I used, they are listed and linked below for your convenience. All supplies can be found at the Simon Says Stamp store.

Supplies:

***If any product is out of stock, just click on the "Notify Me" button and you will receive an alert from Simon when that item is back in stock! 

Now it's you turn! Happy crafting!

Do you use Instagram ?  If so please add  #ssswchallenge to your challenge entry uploads so we can see them on there too.


You have until Wed  8am Ohio time. 1pm UK time, 2 pm CET to join in


Monday, August 8, 2022

Trio of Birthday cards Simon Says Stamp Dream Big release

Just a quick post about the trio of colorful birthday cards that was inspired by the soft plaid background stamp.
I cut three A2 size card bases from smooth white cardstock. I then cut three panels a bit smaller than the card base to leave a white border. I then placed them in my MISTI using the plaid background stamp and made three backgrounds very quickly using my favorite ink color combinations. I then die cut three more panels using a stitched rectangle die to frame the flower die which will be the focus of these cards. I die cut the flowers from coordinating cardstocks to match each card color. I mostly used scraps I have saved. I love when I can use up those scraps! Good color cardstock is not cheap!! I then heat embossed the sentiment and banner using gold embossing powder and embossing ink. I die cut it out and popped it up for a bit of dimension. I added some clear flat sequins and that's it! Very quick and so fun to make.💗

I made a quick little video showing each card I made.

I hope you enjoyed the card I made today. Also, I have listed and linked all the supplies I used to make this card below for your convenience. Have a great day!

Supplies:


Tuesday, August 2, 2022

Tim Holtz Emboss It!

Hi all and welcome to another week of the Simon Says Stamp Wednesday Challenge.

This week the challenge theme is to Emboss It!

We are showcasing Tim Holtz products this week. You don't have to use them to join in but if you have some we would love to see what you make! As always just for entering you will be eligible for the the drawing of a $25 voucher to the Simon store!
Embossing in any form is just magical! It's one of my favorite paper crafting techniques! There are two ways to emboss. One way is to use an embossing folder which is also known as dry embossing and heat embossing which uses a heat tool and a powder that melts. I made an elegant and simple birthday card using both embossing methods.
I made this card using an A2 size card base made from smooth white cardstock
I cut a panel from a heavier weight cardstock and trimmed it down to leave a border. I spritz the panel with a mist of water and added it to the embossing folder. The water prevents the paper from tearing when pressed between the grooves of the embossing folder. 
I then die cut letters from my favorite colors of cardstock using thin alpha dies to spell birthday. I then die cut the same letters from fun foam to add dimension and glued them to a strip of vellum.
I then added a sentiment strip with the word wishes embossed with heat and white embossing powder. I trimmed it down and adhered it with mini foam squares. I added some tiny jewels for some sparkle. 

I hope you enjoyed the card I made today and if you are interested in any of the products I used, they are listed and linked below for your convenience. All supplies can be found at the Simon Says Stamp store.

Supplies:


***If any product is out of stock, just click on the "Notify Me" button and you will receive an alert from Simon when that item is back in stock! 

Now it's you turn! Happy crafting!

Do you use Instagram ?  If so please add  #ssswchallenge to your challenge entry uploads so we can see them on there too.


You have until Wed  8am Ohio time. 1pm UK time, 2 pm CET to join in