Wednesday, April 26, 2023

Hero Arts Anything Goes

Hi all and welcome to another week of the Simon Says Stamp Wednesday Challenge.

This week's challenge theme is Anything Goes!

We are showcasing products from Hero Arts. You don't have to use them to join in but if you have some we would love to see what you make! As always just for entering you will be eligible for the the drawing of a $25 shopping spree at the Simon store!

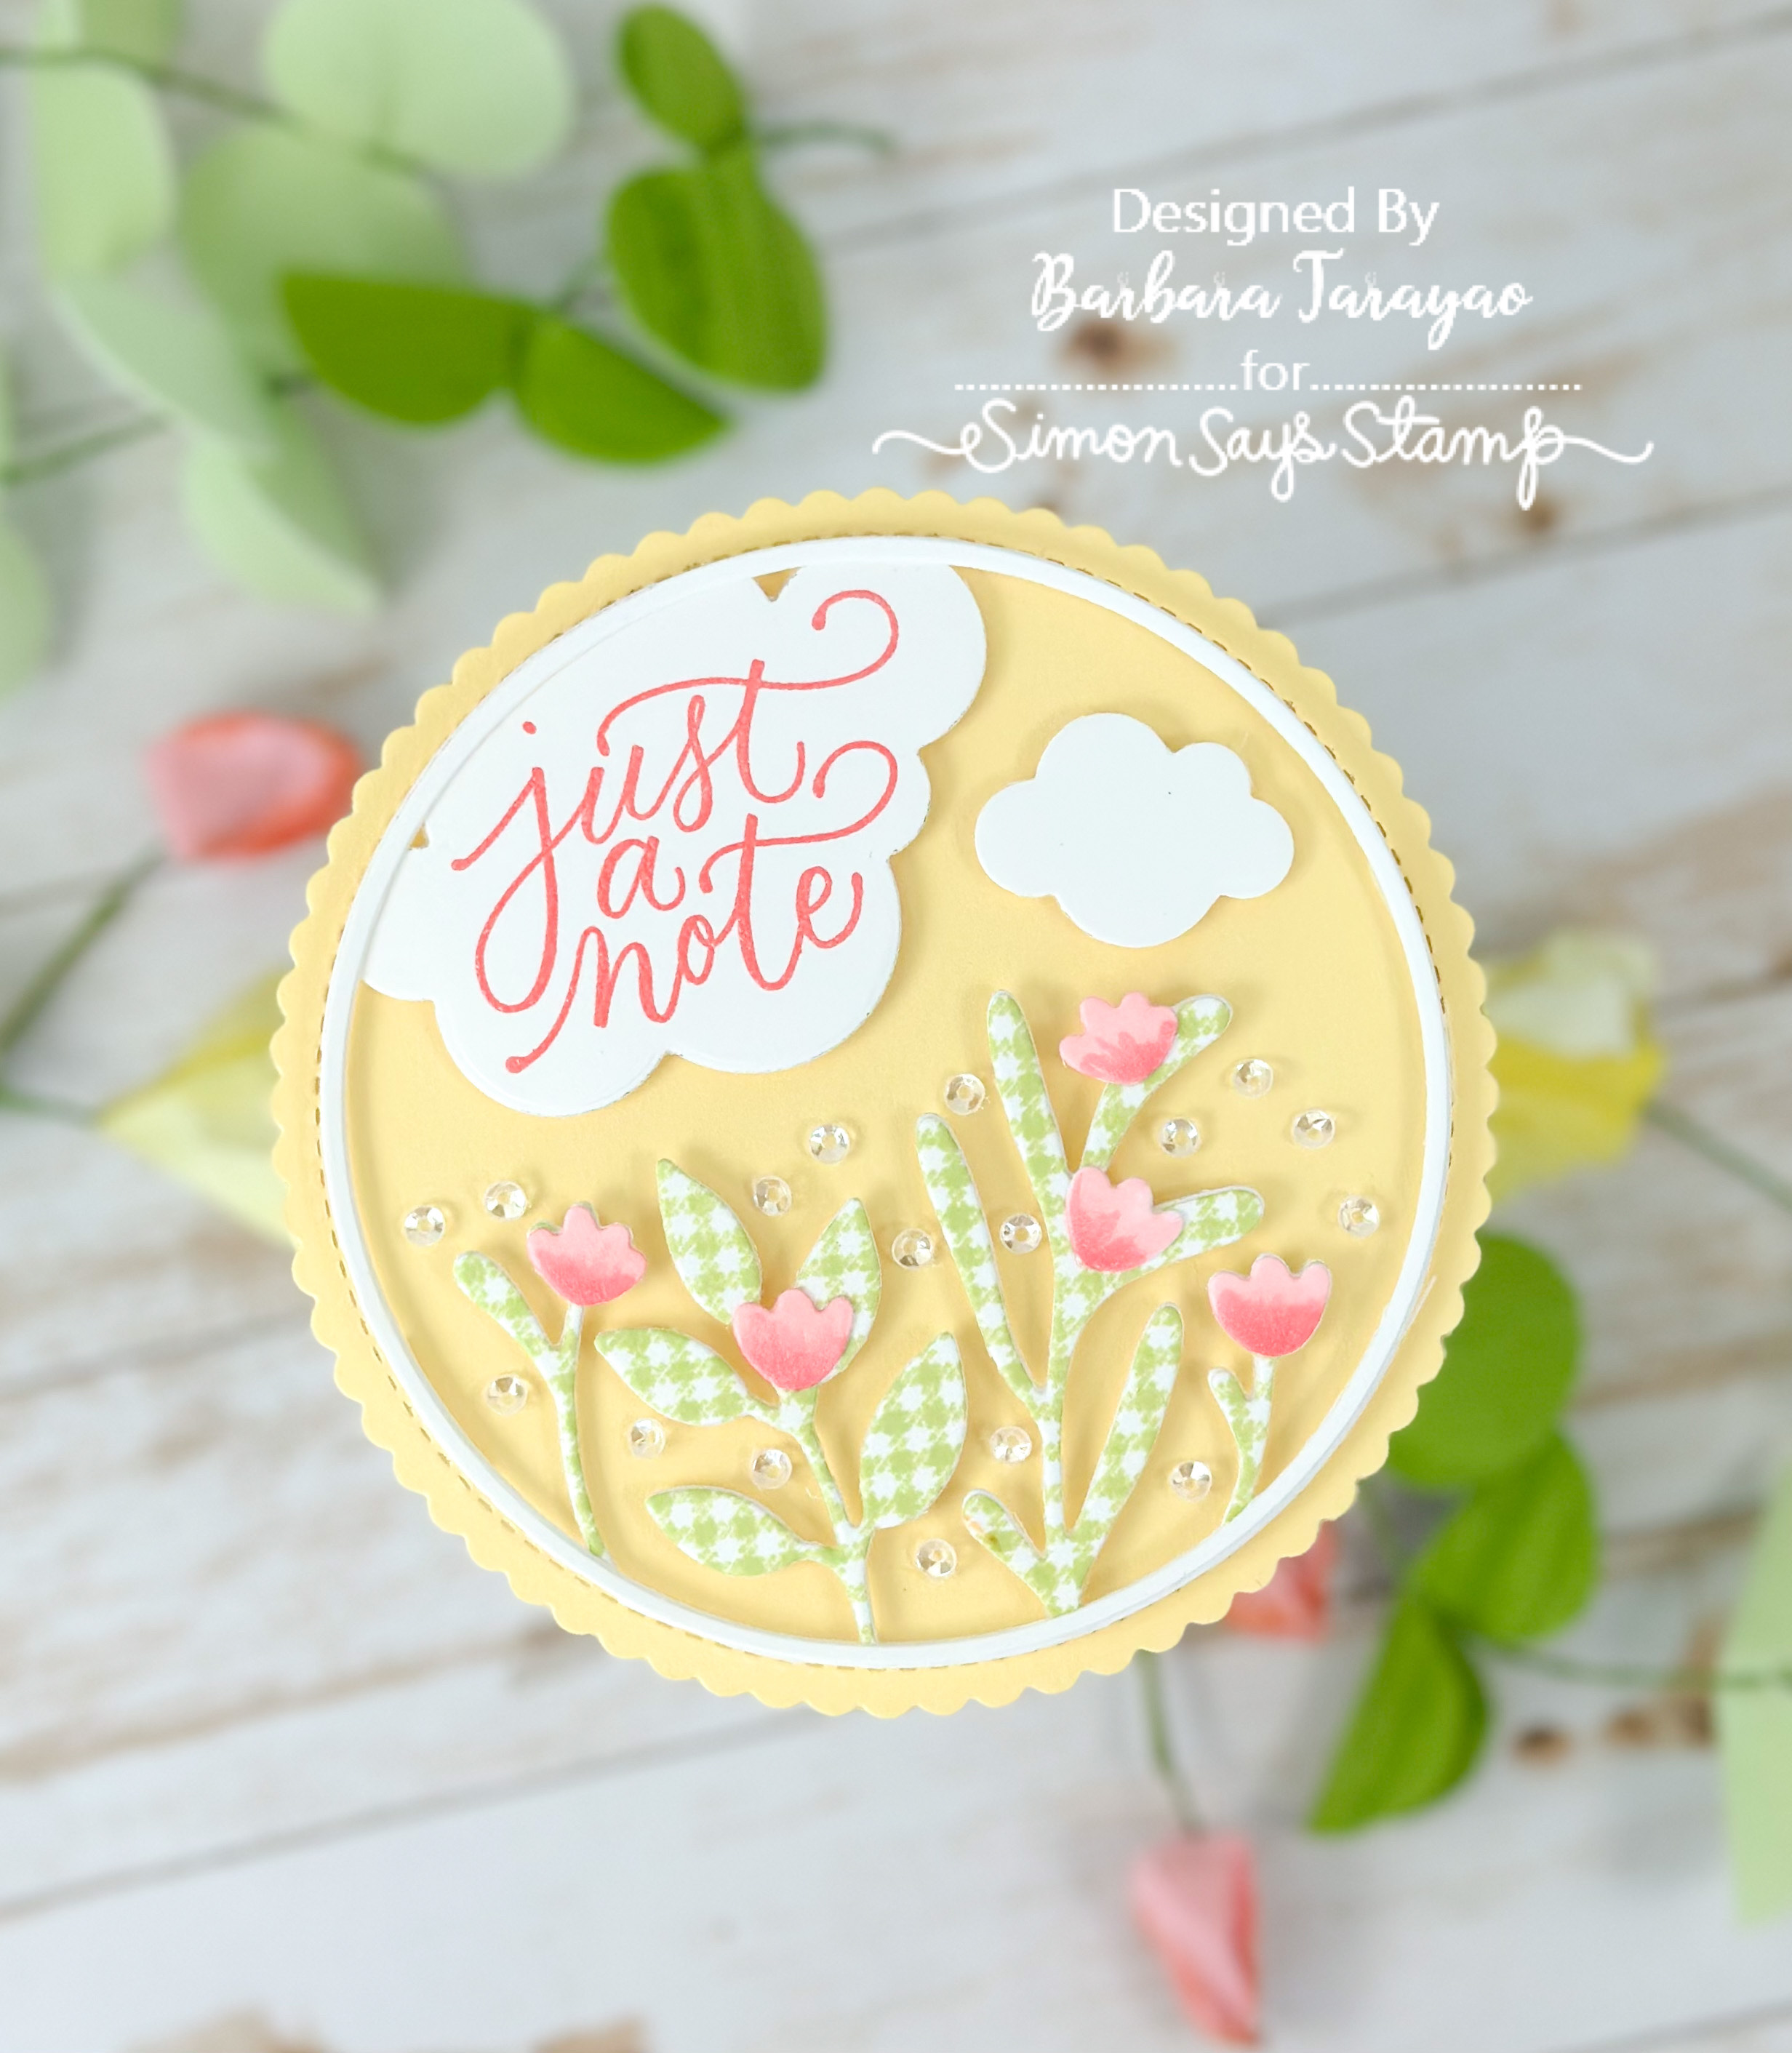
For this week's challenge, I have chosen to use the Hero Arts Looking Glass Birthday Party die set. I just absolutely love the looking glass series of dies from Hero Arts. This is a wonderful way to add so much dimension and interest to a card! This set is a festive birthday scene that gives the viewer a glimpse into a room filled with banners, balloons, presents and a even a cake! So fun!!
I created this card with an A2 size card base made from smooth white cardstock. On a seperate piece of white cardstock I created my own custom plaid background and trimmed it down to fit on the card base and leave a bit of white border.
The set comes with three square window scene dies. Each one I cut out of white cardstock because I wanted to color them using copic markers. The last square I ink blended and added some white splatters for a festive look. I layered up each window scene using a few foam squares for that 3d dimensional look.
I then die cut the sentiment out of white cardstock and layered it up for thickness. I colored it using a copic marker to coordinate with the party scene. To finish this card off, I added some diamond stickles to some of the elements in the window scene.

I hope you enjoyed this fun 3d window card and got some inspiration! I have listed and provided affiliate links below for your convenience to all the products and supplies I used. Thank you so much for stopping by!!

Supplies:

Do you use Instagram ?  If so please add  #ssswchallenge to your challenge entry uploads so we can see them on there too.


You have until Wed  8am Ohio time. 1pm UK time, 2 pm CET to join in


Monday, April 24, 2023

It's Your Day to Shine shaker card

Who wouldn't want a birthday shaker card! I had so much fun just spending some quality time in my craft room. I love to go through my stash of dies and stamps and just play! Visit the Simon Says Stamp store for all your card making needs.
I made this card by trimming down a piece of white cardstock to an A2 size card base. Then using post it tape I masked off stripes to create my own plaid background. I then die cut a stitched rectangle panel and then die cut a stitched circle in the center of that panel. Using liquid glue I adhered a piece of acetate on the back of the panel covering the circle. I stamped the sentiment using oxide ink and then added foam adhesive to the back of the panel to pop it up for the shaker element.
I added the clear sequins for the inside of the shaker. I then die cut the candles from white cardstock and ink blended them to coordinate with the colors I used for the plaid background. I glued the candles to the bottom center of the circle and added some stickles to the flames for a bit of sparkle.
I made a quick video to show the sparkle and shake of this card.

Well I hope you enjoyed the card I have made today and got some inspiration! I have listed and provided affiliate links below to all the supplies I used to make these cards. Thank you for stopping by!!

Supplies:


Sunday, April 23, 2023

Quick and Easy card

Let's make a quick and easy card!
I made this card using an A2 size card base made from smooth white cardstock. Using more white cardstock I die cut a stitched rectangle panel to leave a border. I stamped the pencil image 5 times from the Take Note stamp set from the new Dream Big release. I used a copic friendly ink that does not smear. I colored each pencil in using some basic primary colors. I fussy cut them out and aranged them around the sentiment that I stamped in black ink. I trimmed off the pieces of pencil hanging over and used to cut pieces to fill in white spaces. 
I made a quick video to show you how I made this card. Please leave a comment if you have any questions! Thank you for stopping by.


Wednesday, April 19, 2023

Honey Bee Things With Wings

Hi all and welcome to another week of the Simon Says Stamp Wednesday Challenge.

This week's challenge theme is to make Things With Wings!

We are showcasing products from Honey Bee Stamps. You don't have to use them to join in but if you have some we would love to see what you make! As always just for entering you will be eligible for the the drawing of a $25 shopping spree at the Simon store!

Spring has finally sprung here! Bring on the blooms! I wanted to make a fun and cheerful card for this week's challenge.
I know this card has a lot going on but it was actually very easy to make, infact, I made two other birds for this card but decided to just add the one.
I made this card using an A2 size card base from cream cardstock. I then die cut a stitched rectangle from white cardstock for my main panel. I then die cut everything from white cardstock and ink blended them with distress oxide. So easy!
I ink blended the leaves, flowers and birdie and adhered them to the card with foam adhesive. I then die cut the banner tag to showcase my sentiment also from white cardstock. I stamped the sentiment in clear embossing ink and heat set it using white embossing powder. I then ink blended the banner and the white embossing powder was able to resist the ink. I then die cut the word hello out of matte gold cardstock and popped it us using foam adhesive. The last touch to this card was the tiny little orange gems I added to the birdies belly!

I truly hope you enjoyed my little spring card today and got lots of inspiration! I have listed and provided affiliate links below for your convenience to all the products and supplies I used. Thank you so much for stopping by!!

Supplies:

Do you use Instagram ?  If so please add  #ssswchallenge to your challenge entry uploads so we can see them on there too.


You have until Wed  8am Ohio time. 1pm UK time, 2 pm CET to join in


Monday, April 17, 2023

Trio of Mother's Day/Miss You cards

I had a pretty tough week, I won't bore you with details or whine and complain but let's just say it has changed my life for the better. So when I was able, I had myself an amazing color therapy session! I chose a set of colors that make me happy, created some fun plaid backgrounds and went to town!
I made a couple of mother's day cards and a missing you card. I lost my mother to cancer when I was very young so I thought this combination of cards would be perfect. A friend of mine lost her mother not too long ago and she still makes her mom a card for mother's day. I love that about her.
So here they are and because I have three cards in this one post, I'll try to be brief in my description of how I made each one. If you have a question about anything, please leave me a comment down below.
Mother's Day Banner card:
I began with an A2 size card base using white cardstock. I then created a diy plaid background using post it tape and distress ink. I did use some stitched and solid line stamps from my stash for detail. I'll try to link something similar you can use below. I then die cut that panel out using a stitched rectangle die set and added it to the card base. I then die cut several of the leaf dies and layered them onto each other with glue and 3d foam squares. I heat embossed the sentiment onto a piece of teal cardstock and heat set that in white. I used the coordinated die to cut the banner out and nestled it under the leaves. I then added a white frame and some jewels for some sparkle.

Mom card:
An A2 size card base made from smooth white cardstock. I folded it landscape way and stamped in yellow ink a buffalo check background with some teal stripes. I die cut a floral frame three times from white cardstock for thickness and colored in the centers of the leaves and flowers using copic markers. I added that to the card and die cut the Mom die three times as well and adhered it together with liquid glue. I added that to the center of the frame and added an embossed sentiment on orange cardstock using white embossing powder. Last, I added some diamond stickles for a bit of sparkle.

Miss You card:
A2 size card base made from smooth white cardstock stamped with yellow ink in a plaid pattern. I used a floral cover plate die cut 2 times from more white cardstock and colored with copic markers. Adhered using foam adhesive to pop up florals. I die cut the Miss You sentiment from white cardstock twice and glued together with liquid glue. Shadow for sentiment was cut from orange cardstock and glued to florals. I added some stickles to the center of each flower for some sparkle. I added a separate stitched border for a bit of dimension.

Well I hope you enjoyed the projects I have made today and got some inspiration! I have listed and provided affiliate links below to all the supplies I used to make these cards. Thank you for stopping by!!

Supplies:


Wednesday, April 12, 2023

Mama Elephant Make a Shape Card

Hi all and welcome to another week of the Simon Says Stamp Wednesday Challenge.

This week's challenge theme is to make a Shape Card!

We are showcasing products from Mama Elephant. You don't have to use them to join in but if you have some we would love to see what you make! As always just for entering you will be eligible for the the drawing of a $25 shopping spree at the Simon store!

This week's challenge is to make a shape card. You can make any shape except a rectangle or square card. I chose to make a circle scalloped card. 
The trick to making a shape card is to create a top or side folding base that fits or is the same shape of the front of the card. When you figure that out, you can make any shape you want. I went the easy route and used circle dies to create the base of my card.
I then die cut a scalloped circle a bit larger than the card base out of yellow cardstock. I then used the Foliage Circle die to decorate the front of my shape card. I die cut it out of white heavy weight cardstock. I colored in the flowers with copic markers and paper pieced the stems and leaves with left over pattern paper from a previous card. 
I stamped the sentiment from the Mama Elephant Paola's Wishes stamp set onto white cardstock and die cut that out using a cloud die. I added another smaller cloud die to complete my spring scene. I added some small clear sequins for a bit of sparkle.
I hope you have enjoyed the project I have made for this fun birthday challenge and got some inspiration. I have listed and provided affiliate links below for your convenience. Thank you so much for stopping by!!

Supplies:

Do you use Instagram ?  If so please add  #ssswchallenge to your challenge entry uploads so we can see them on there too.


You have until Wed  8am Ohio time. 1pm UK time, 2 pm CET to join in


Monday, April 10, 2023

Miss You Squares Beautiful Days release

Hello! Thank you for stopping by! I wanted to share a fun way to use the new Five Squares dies from the Simon Says Stamp Beautiful Days release.
First time I saw these dies I wanted to make a shaker card! I thought about it some more and realized that in my home I have a wall of art on white canvas in a set of 4 and it gave me inspiration for this card.
I began with an A2 size card base made from smooth white cardstock. I then die cut a panel from the stitched rectangle dies. I then die cut the squares. The set comes with 4 squares as one die and a single square die. I used the four that were connected to die cut out of white cardstock and adhered them to the white stitched panel with 3d foam adhesive squares.
I then decorated the 4 squares with die cut flowers from my stash. I die cut them out of colored cardstock and even stamped a pattern on to the leaves for a bit of interest. I popped the flowers and leaves up with more foam squares and added some clear flat drops. For the sentiment, I used the coordinating blue cardstock and the Small Script 2 dies. One of my favorite word die sets. I just love the font of them! So elegant. I think they might have been designed by Kristina Werner.

I hope you enjoyed the card I have made and got some inspiration! I have provided affiliate links below for all the supplies I have used to make this card. Thank you so much for stopping by and I hope you have an amazing day!!

Supplies:

Friday, April 7, 2023

Simon Says Stamp Beautiful Days Blog Hop - Day 1

I'm so happy to be part of the new Simon Says Stamp Beautiful Days Blog Hop. You can see the entire new release HERE!
Make sure you use the special code for this blog hop while you shop until April 9thπŸ‘†

I have a couple of projects that I'm sharing using a few of the new products from the release.
This first card is my attempt to be artsy! I don't usually like to get my fingers messy but I have to admit this was fun to make!
I made this card using an A2 size card base made from smooth white cardstock. I then took a piece of watercolor paper and stamped the Geo Leaf Background using my MISTI stamping tool. I stamped it using clear ink and embossed it with white embossing powder. Make sure you stamp it at least twice because watercolor paper is very porous. I then heat set and taped it down to a hard board. 
Using Lindy's Magical Powders and a dry paint brush, I added the powder a little at a time to create an explosion of color then added water with a mini spray bottle. I then used a 2nd "wet" paint brush to move the water around for my desired effect. There really isn't any right or wrong way to do this. Just add more powders if you want more color or use a paper towel to take away color you don't like. I made a little video showing a bit of the process.
I also added the new Rose-Winged Butterfly die for a bit of bling! I die cut the butterfly out 3 times from white heavy weight cardstock. I then added vellum to the back using liquid glue. I trimmed the vellum so you could only see it through the butterfly. I then turned it over and colored the vellum areas of the wings and body using copic markers. I then turned it over again and added some ice stickles for some sparkle. The sentiment was stamped and embossed with gold embossing powder from the new Garden Fresh stamp set. I die cut the MUM die several times from colored cardstock and added it underneath the butterfly.

Supplies used:

This next card is also for Mother's Day. I couldn't help myself from making a shaker card!
This card was also an A2 size card base made from smooth white cardstock. I trimmed down another piece of white cardstock and trimmed to leave a bit of a white border. I then ink blended the panel with distress oxides. I then laid over the Chunky Knit Stencil and added a thin layer of paper glitz glaze for some shimmer. I set that aside to dry while I die cut the new Simple Mother's Day die 3 times from white cardstock and adhered together for thickness. 
When the panel was dry I used the shadow die from the Simple Mother's Day die set and cut out a window. I then adhered a piece of acetate to the back of the ink blended panel along with lots of strips of foam adhesive to accommodate space for the shaker element. I then added the sentiment in the center of the acetate and fussy cut a frame around it. I then die cut a few leaves from the new Leafy Sprig die and added more of the shimmer glaze to the tops of them for some shine.

Supplies used: 

I hope you have enjoyed the projects I have shared today and got some inspiration! More inspiration for this amazing release can be found on the Beautiful Days Gallery. I have provided a list of all the blog hop participants. 
Make sure you leave a comment to have a chance to win a $25 shopping spree at the Simon store. Each blog participant in the hop you leave a comment on will give you more chances to win! More chances to win so don't miss Day 2!! Happy hopping and thanks for stopping by!


Wednesday, April 5, 2023

Simon Says Stamp Beautiful Days release day

It's the new Simon Says Stamp Beautiful Days release day!! I have a couple of projects that I have made for this release day! If you want to see the whole new release click HERE!
I have made a couple of project to share using some of the amazing goodies in this release!
First up, can you really have enough birthday cards? 
I made this card using an A2 card base made from smooth white cardstock. I then used another piece of white card stock to trim down a panel to leave a bit of a white border. I took that panel and created a unique pattern using the new Bold Geometric stencil. Using some distress inks I blended some light pink and then a bit of dark pink and then applied some texture glaze over top. I removed the stencil and set it aside to dry. 
I then die cut out new Large Fancy Happy Birthday die 3 times from white cardstock for thickness and adhered together using liquid glue. I set something heavy on that to keep it together while it dried. I then took the dry stenciled panel and ink blended some purple distress ink over the pink for a very colorful eye catching background. I then die cut some Streamer Ribbons from holographic cardstock and added them with the sentiment to the card. Very simple but packs a punch!   
This next card was made from smooth white cardstock and cut to be an A2 card size. I then ink blended on white cardstock a panel with distress oxides in a rainbow of colors. I then added some texture with the Chunky Knit Stencil and some texture glaze to add some shine. I set it aside to dry and trimmed it down to leave a white border.
I then die cut the new You're Like a Mother to Me die out of white cardstock 3 times for thickness. I then cut the shadow out of white cardstock and ink blended it using pink distress oxide to make the sentiment pop. I adhered it to the card along with the pre-printed black and white sentiment strip. 

I hope you got some inspiration and enjoyed the new Beautiful Days release! I have affiliate links at no cost to you below if you are interested in the products I used to make these cards. Thank you for stopping by!

Supplies: