Monday, January 29, 2024

Silver Celebrate card

How many of your craft goodies you thought you could not live with out end up stashed away collecting dust! I try to pull out those older items and show them some love now and then! Today's project showcases a couple of not so "new" items that I just adore and always will!
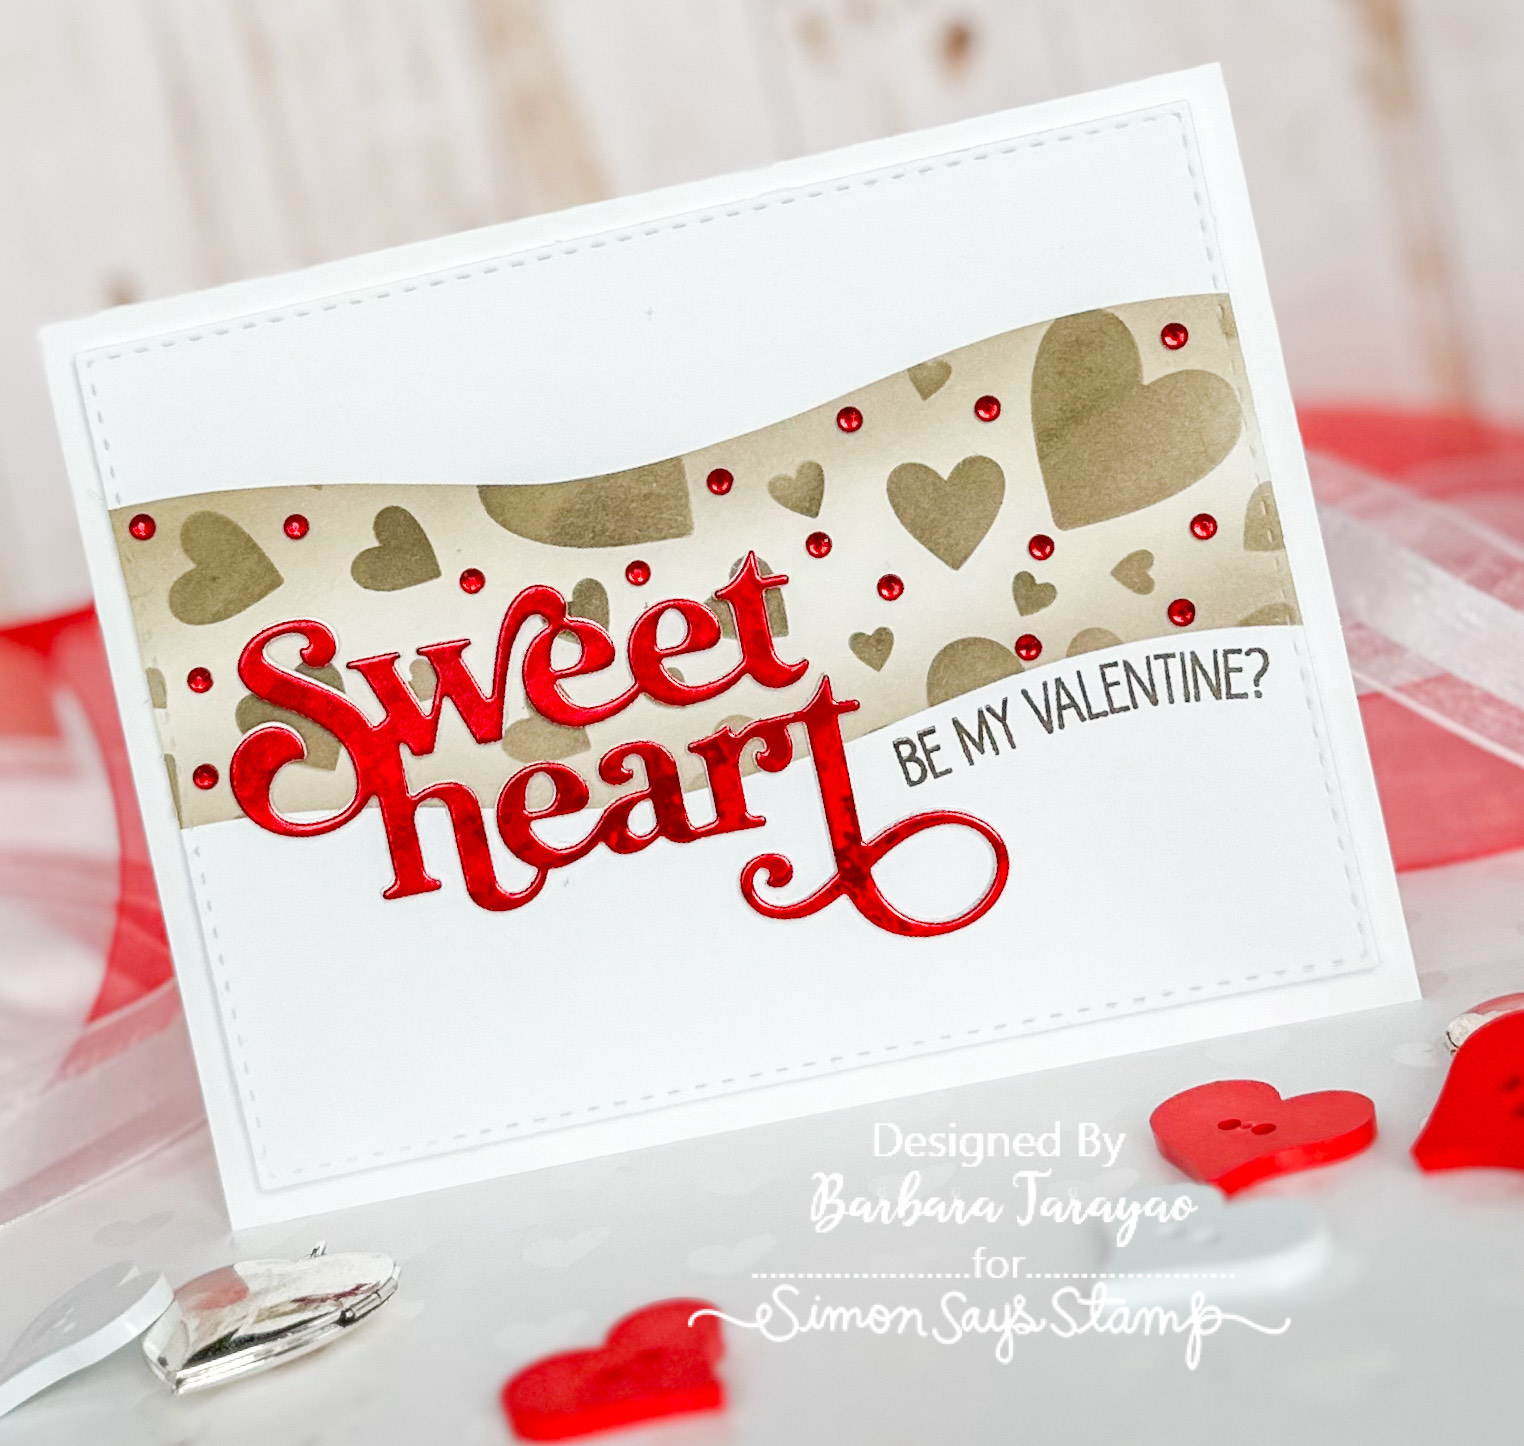
One of my favorites is the beautiful Eucalyptus Leaves die set. I just love the shape and textures of these leaves and just had to have these leaves in my collection. 
I made this card using an A2 size card base made from smooth white cardstock. I then trimmed down another piece of cardstock using a wonky rectangle die for my ink blended panel. I chose the size of rectangle mask stencil I wanted to use and placed over the white panel to ink blend with distress oxides.
I then removed the mask to reveal the beautiful blended rectangle on the white background. I then die cut the Eucalyptus Leaves out of white cardstock and adhered them to the center of the inked panel with some foam squares. 
I then die cut the Celebrate sentiment out of silver cardstock and adhered it over the leaves with more foam squares. To finish this card off, I added some flat sequins for a bit of sparkle.
It's so fun collecting craft supplies and it's even more fun to get a lot of use out of them! I hope you enjoyed this post today. I have affiliate links to all of the supplies I have used to create this card for your convenience. Thank you so much for stopping by!! Happy crafting!

Supplies:

Thursday, January 25, 2024

Printmaking Hearts Valentine

I am happy to share a project using the Simon Says Stamp Printmaking Hearts stamp set from the new Sweetheart release!
It's that time of the year to make gorgeous little projects to give to your sweetheart! Valentine's Day is so special to me for a couple of reasons. One being that it is my mother and my son's birthday.πŸ’—
I made this card using an A2 size card base out of smooth white cardstock. I then trimmed down a piece of white cardstock to leave a bit of a border. I ink blended this panel with a few pink distress inks. From darkest to lightest. I added some water, white paint, and ink splatters. I adhered this panel to the card base.
Using the Printmaking Hearts stamp set I created the hearts and then die cut them out using the coordinating die set. I arranged them on the ink blended panel with 3d foam squares. I then stamped the sentiment onto craft cardstock in pink ink and trimmed it down to me a strip. I also adhered to the the card using foam adhesive.  I added a couple of pink jewels for a bit of bling!

I hope you have enjoyed the project I shared. I have listed and linked all the products I used for your convenience. Thank you so much for stopping by!!

Supplies:


Wednesday, January 24, 2024

Tim Holtz Add Some Texture

Hi all and welcome to another week of the Simon Says Stamp Wednesday Challenge.

This week's challenge theme is Add Some Texture!

We are featuring products from the amazing Tim Holtz. You don't have to use them to join in but if you have some we would love to see what you make! As always just for entering you will be eligible for the the drawing of a $25 voucher to the Simon store!


I just love creating texture on a project. I am in love with texture fades from Tim Holtz. They can create amazing texture and many ways to play with them.
I made three cards using the Mini Botanicals texture fade embossing folder. I am always in need of wedding cards so I have used this beautiful embossing folder to create romantic backgrounds!
I made each card using an A2 card base made from smooth white cardstock. I then inked up the flat side on the inside of the folder to create an ink press. I then trimmed the inked and embossed panel down to leave a bit of a white border. I also used a swiss dot embossing folder with more white cardstock for the lower half of the panel.
I then tied a white organza ribbon around the panel and adhered it to the card base. I die cut the word Congrats from silver and white cardstock. Layered them together for thickness and added it under the ribbon. 

I hope enjoyed the cards I have made for this challenge and got some inspiration! I have listed and linked all the products I used for your convenience. Thank you so much for stopping by!!

Supplies:
Now it's your turn! Happy crafting!

Do you use Instagram ?  If so please add  #ssswchallenge to your challenge entry uploads so we can see them on there too.


You have until Wed  8am Ohio time. 1pm UK time, 2 pm CET to join in

Friday, January 19, 2024

Sending love & hugs Scorched Timber card

I was very happy to try out the new Scorched Timber distress color on a project to share! I have not used the distress sprays before and I have to admit it was messy but so much fun! Obvious tip: use a spray/splatter box! I got it everywhere! If you want to check out the full line of the Scorched Timber color just click here.
I made this card with a piece of watercolor paper to create a distress ink panel. I trimmed it down to leave a bit of a white border on an A2 size card base.
I then used the distress sprays to flood the water colorpaper with this gorgeous color! I dried it quickly with a heat tool. When it completely dry, I used a swiss dot background stamp and embossed it using gold embossing powder. I also used a gold mica water color to add more gold detail by splattering and brushing on the gold color.
I then die cut out flowers and leaves from white, yellow and olive color cardstock and added them to the distressed panel on the card base. I used a combination of liquid glue and foam squares to adhere them on. Last I stamped a sentiment using clear ink and heat set it with gold embossing powder. 
I hope you enjoyed the project I made using the new (and last😐) distress color from Tim Holtz. I have listed and linked all the supplies I used. Thank you so much for stopping by! Happy crafting!

Supplies:

Wednesday, January 17, 2024

Riley and Co. Let's Have Some Fun

Hi all and welcome to another week of the Simon Says Stamp Wednesday Challenge.

This week's challenge theme is Let's Have Some Fun!

We are featuring products from Riley and Co. You don't have to use them to join in but if you have some we would love to see what you make! As always just for entering you will be eligible for the the drawing of a $25 voucher to the Simon store!


I'm having some fun creating a very textured birthday card for this challenge! This card will definetly need and A7 size envelope if you want to mail it to someone.
I am creating some beautiful butterflies that will be flying off the card. I also wanted these butterflies to have a stained glass look. Here is how I did it. I will have a reel posted on my Instagram page showing visually how I did it.
First I used an embossing folder and gold paint to create a lovely textured background panel for my A2 sized card base out of smooth white cardstock. I then stamped the sentiment in clear ink and embossed it using a gold embossing powder that I heat set for more gold accents.
Using a acetate that is heat resistant I stamped gold butterflies on it with clear ink and embossed them using a gold embossing powder. I then turned the acetate over and used alcohol inks to create a colorful "stained glass" look behind the butterfly images. 
I then fussy cut them out (or you could use the coordinating die to cut them out) and arranged them with glue dots on the card around the sentiment to create the illusion that the butterflies were flying off the card.

I hope you have some fun creating and got some inspiration from my project today. I have listed and linked all the products I used for your convenience. Thank you so much for stopping by!!

Supplies:
Now it's your turn! Happy crafting!

Do you use Instagram ?  If so please add  #ssswchallenge to your challenge entry uploads so we can see them on there too.


You have until Wed  8am Ohio time. 1pm UK time, 2 pm CET to join in

Friday, January 12, 2024

Simon Says Stamp Smitten and Sweetheart blog hop day 1

 I am so excited to be part of the Simon Says Stamp Smitten and Sweetheart blog hop!If you would like to see both new releases just click HERE

Make sure you take advantage of the the special blog hop promotion with any purchase when you shop today!! Also remember to leave a comment here and each blog you visit on the hop. Each comment you leave will earn you more chances to win a $25 shopping spree at the Simon store! Winners will be selected from the comments on January 12th on Simon's blog. Good luck!
Here is a couple of projects I made using goodies from the new release. 
I wanted a fun background to feature the new Fancy Love You die so I made my own valentine's plaid using distress ink. I used the inks as watercolors on watercolor cardstock. I used three sizes of paintbrushes and white gel pen to create thin white lines.
I then die cut the Fancy Love You from silver cardstock and the shadow from white cardstock. I also die cut a frame from silver cardstock as well. The sub-sentiment was stamped with clear embossing ink and heat set using white embossing powder. I die cut a few hearts from the Love Ya tag from more silver cardstock and added them to the card as accents.
The next card I made features the SweetHeart die. Again, I wanted a fun background to showcase this die.
I masked off an area on a stitched die cut rectangle cut from white cardstock. Using Mocha and Cappuccino Pawsitively Saturated ink and a heart stencil to create a fun background. I added some red jewels for a bit of sparkle.
I die cut the Sweetheart from red metallic cardstock. I die cut it twice from thick white cardstock to add thickness with liquid glue. I then stamped the sub-sentiment from Printmaking Hearts stamp set.
Make sure you check out Day 2 of this blog hop to see what some of your favorite makers have created! There is even more inspiration if you visit the Smitten and Sweetheart galleries.

I hope you are enjoying your time hopping with us today and getting lots of inspiration! If you are interested I have provided affiliate links to all the supplies I used for your convenience. Thank you so much for stopping by! Happy hopping!

Supplies:

Love You card
< div>
Sweetheart Card


Wednesday, January 10, 2024

Simon Says Stamp Sweetheart release day

Sharing a project for the new Simon Says Stamp Sweetheart release day! Click HERE to see the entire release!
I had so much fun playing with the new Friendship Leafy Cluster stamp, stencil and dies. It makes creating a beautiful card so easy!
I made this card with an A2 size card base from smooth white cardstock. I then trimmed down another panel of white cardstock to leave a bit of a border. I then stamped the new Regal Hearts background stamp on this panel with clear ink and heat set it with gold embossing powder.
I then added the leaves that I stamped from the Friendship Leafy Cluster stamp set onto white paper, stenciled with distress oxide inks using the coordinating stencils and then die cut them out with the coordinating dies.
I die cut out the new Bestie from gold cardstock and the shadow from white cardstock. I ink blended the shadow and added it to the card with liquid glue and 3d foam squares. I used more gold embossing powder to the stamped sub-sentiment which is from the Printmaking Hearts stamp set.

I hope you are enjoying the new Sweetheart release and the project I made. For your convenience I have listed and linked all the supplies I used. Thank you for stopping by!! Happy release day!!

Supplies: